Hello, all. Do you
have a special someone in your life who is about to have a birthday? Do you want to give him or her a fun party,
no matter what his or her age is? Does
this person love Pokémon? Well, then do
I have some ideas for you!
I would like to begin by stating that my boyfriend and I are
both college students. But, that won’t
stop us from having some good, old fashioned fun. We both love Pokémon, I love planning fun
parties, and he had a birthday coming up!
So, everything was lined up perfectly to throw him a Pokémon-themed
birthday party… well, almost everything.
Did I mention that we are both college students? An 8-pack of Pokémon plates online costs
about $5. We had 15 people at the
party. So, that means two sets of
plates: $10. Add in cups, napkins, party
hats, and decorations, and I would have spent over $30, probably even over
$40. So, I did the next best thing: I
searched the internet for alternatives.
However, I quickly discovered that the internet is not loaded with
Pokémon-party ideas. So, I’ve compiled a
list of some of my favorites as well as how to implement them!
 |
| The picture qualities aren't the best, but you will hopefully get the idea |
Pokémon Cups and Party Hats:
Materials:
o
plain or colored cups
o
party hats
o
access to a computer with Paint or a similar
program
o
access to a color printer
o
glue and scissors
Directions:
1) If you wish to make your own Pokémon circles,
please do so! Perhaps the subject of
the party likes different Pokémon than my
boyfriend and I. Or, if you like, you
may certainly use mine! If you choose to make your own, however,
here’s some
steps:
1.1)
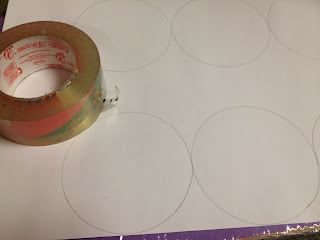
Draw circles on Paint or your editing program.
Make these circles large with a thin line. If you want perfect circles,
press the Shift button while you
click and drag. I found that a 4x3 matrix of circles on one
page
makes for good-sized Pokémon.
1.2)
Draw a slightly smaller, and more bold (thicker line) circle inside your larger circles.
Hint: If you want to save some time, only
make one set of circles and then copy and paste the rest!
1.3)
Find pictures of Pokémon from online and save them to your computer.
Hint: For those of you who know nothing
about Pokémon, it helps to find out the names of some and then type
the names into Google. If you just type “Pokemon”
you’re going to have a more difficult time finding ones that you can use!
1.4)
Beginning with only one picture, paste it onto Paint. Resize it so that it fits inside
the circle. You may need to redraw one
or both of the circles depending on the
size of the box around the Pokémon.
However, it is not too difficult to line the circles up.
2) Print
your pages.
3) Cut them
out.
4) Glue
them onto the cups and hats.
Walla! You have some cheap cups and party hats!
Pokémon Decorations
 |
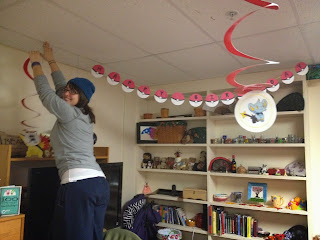
| Several of my friends helped me decorate. |
Materials:
o
access to a computer with Paint or a similar
program
o
access to a color printer
o
scissors
o
tape
Optional
Materials:
o
glue
o
tablecloth (plastic and cheap if you’re trying
to save money)
o
construction paper, red, white, and black (for
“Happy Birthday” sign)
o
cardboard (for Pokémon stand ups)
o
twirly ceiling decorations (or paper plates to
make them)
o
string (for twirly ceiling decorations and
“Happy Birthday” sign)
o
ribbons (I went with a red, white, and black
theme. It just seemed to fit.)
Directions
for twirly ceiling decorations:
1) Find
some pictures of Pokémon and save them to your computer.
1.1)
Draw circles on Paint or your editing program.
Make these circles large with a
thin line. If you want perfect circles,
press the Shift button while you click and drag. I found that a 4x3 matrix of circles on one
page makes for good-sized Pokémon.
1.2)
Draw a slightly smaller, and more bold (thicker line) circle inside your larger
circles.
Hint: If you want to save some time, only
make one set of circles and then copy and paste the rest!
1.3)
Find pictures of Pokémon from online and save them to your computer.
Hint: For those of you who know nothing
about Pokémon, it helps to find out the names of some and then type
the names into Google. If you just type “Pokemon”
you’re going to have a more difficult time finding ones that you can use!
1.4)
Beginning with only one picture, paste it onto Paint. Resize it so that it fits inside
the circle. You may need to redraw one
or both of the circles depending on the
size of the box around the Pokémon. However,
it is not too difficult to line the
circles up.
2) Print
your pages.
3) Cut them
out.
4) If you
do not have store-bought twirly ceiling decorations, make your own with plastic plates!
4.1)
Using the scissors, cut a spiral in the paper plates.
4.2)
Cut a small hole near the end of the outermost section.
4.3)
Tie string in the hole.
5) Glue a
Pokémon circle onto the centermost end of a twirly ceiling decoration.
Hint: If you are using colored paper plates,
make sure the colored side will hang so
that it is facing the ground. This way,
no one will know that only one side is colored.
6) Let dry,
and then hang!
Directions
for “Happy Birthday” Sign:
 |
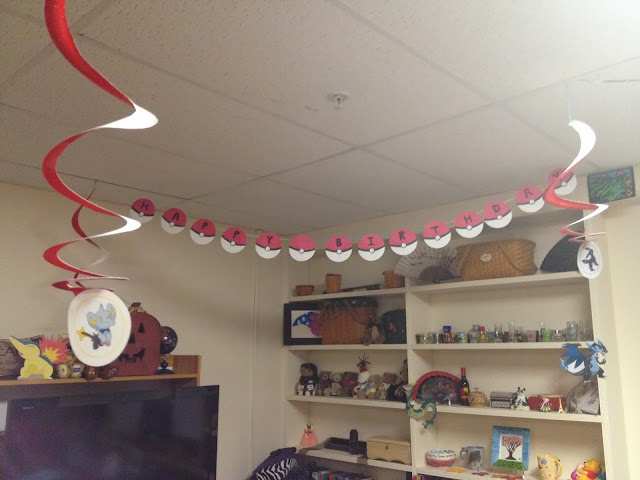
| You can see the "Happy Birthday" sign in this picture. |
1) Find
something round that is good for tracing and is a good size for a pokéball for
one of the letters. I used a roll of duct tape.
2) Trace 14
of these on red construction paper.
3) Trace 7
of these on white construction paper.
4) Find
something round that is good for tracing that also has a larger circumference
than the pokéball.
Hint:
I used something that had almost twice the circumference.
5) Line up
your larger object so that it runs through both of the center edges of the
white circles. Now, turn the circle so that you trace
another line that is a mirror of the first line.
Hint: It should look like an eye when you
finish.
6) Take
your larger tracing object and place it on the black construction paper. Trace a line
that is longer than your already-traced circles. Move the tracing object and trace a second line so that there is a small
space in between the two lines. Do this
so that you have 14 curved
bars.
Hint: They should be about a centimeter wide.
7) Take a
quarter and trace 14 circles on the black construction paper.
8) Using a
dime or nickel, trace 14 circles on the white construction paper.
9) Cut out
everything.
10) Glue
everything together to make pokéballs.
You may need to trim your curved, black,
bars.
11) Writing
one letter on each ball, spell out the words “HAPPY BIRTHDAY.”
12) Tape
each of the pokéballs to the string.
13) Hang
from the celing!
Directions
for Pokémon stand ups
1) Print
out pictures of Pokémon. Have each take
up an entire sheet of paper.
2) Cut out
the Pokémon.
3) Glue the
Pokémon to the cardboard.
Hint: I used empty cereal boxes.
Hint: If you use a box,
glue the Pokémon so that the bottom of the figure is at the edge
of the box, that way there is a piece that folds easily.
4) Cut the
Pokémon figure out of the cardboard.
Hint: don’t completely cut out the
bottom. Leave about two inches so that
you have something to fold over.
5) Cut out
a strip of cardboard that is about two inches thick.
6) Tape
this strip onto the back of the cutout and onto the part that foldes over. This will keep
the cutout standing.
Decorating
the room:

Table: I just laid a cheap, plastic tablecloth
across the table. Then, I set the cups
and hats on the
table so that people could choose theirs as they entered the apartment.
Wall: I taped some cut-out Pokémon on various parts
of the wall.
Ceiling: I hung my twirly cut outs, “Happy Birthday”
sign, and ribbon from the celing.
How about that cake?
Well, I
will be honest; my cake was very time consuming. It took me over 5 hours to decorate the cake
and cupcakes, but I was extremely pleased with the results. I will tell you how I did what I did; but,
there are probably other cake options if you aren’t as into cakes as I am.
Materials:
o
a small, plastic Pokémon (about 2 inches tall,
can be purchased from Amazon (I used a Lucario, my boyfriend’s favorite.))
o
a spherical cake pan (If you don’t have one, go
ahead and purchase one. I love mine, and
they can be used for so many fun cakes.
Plus, they just look awesome!)
o
icing bags and star tips (if you’ve never used
them before, it’s really not difficult. I’m sure you could find a tutorial
online)
o
various colors of food coloring (black and red
are a necessity; but I used other colors such as yellow, blue, purple, and
pink)
Directions:
1)
Bake your cake following the directions.
Hint: To make a thicker cake and avoid your
cake “sinking” once it is all together, use less oil…
substantially less oil. Like, one
tablespoon and only
one tablespoon.
2) I made cupcakes
with the leftover cake batter.
3)
Put your cake together, and put the crumb coat on.
Hint: A crumb coat is a layer of icing that
catches all the crumbs so that you don’t get any crumbs into your
top-layer icing.
Hint: Don’t forget to cut out a spot in your
cake to stick the Pokémon. Put him in the cake before you put it together.
 |
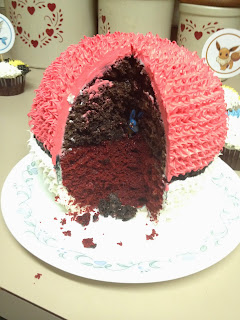
| You can see the Pokemon sticking his head out from the center of the cake. |
4)
Stick in the fridge and let the crumb coat harden overnight (no need to cover).
5)
Take a toothpick and draw the designs you want to use into the crumb coat on your
cake/cupcakes (another handy reason to use a crumb coat). For the main cake,
I made a traditional pokéball; but, for the cupcakes, I did a variety of pokéballs.
6)
Mix your icings (this takes place right before you use them).
7)
Using the icing bags and star tips, decorate your cake. I began with the black circle
in the main cake and all the cupcakes (for this part, I actually used a plain tip, not the star
tip, but a star tip would look nice, too)
8)
After much toil, you will have a pretty awesome cake. Remember to put toothpicks
in your cake before putting any ceranwrap around it so that you don’t ruin all your hard
work.
Games:
Seeing as I
was throwing a party for a bunch of college students, I didn’t want to overload them with games. However, I couldn’t resist just one… Pin the
Tail on the Pikachu!
Materials:
o
access to a computer with Paint or a similar
program
o
access to a color printer
o
scissors and tape
Directions:
1)
Find a high-resolution picture of Pikachu.
Copy and paste him into Paint, and then
make him LARGE. I made him to cover 6
sheets of paper – a section that was
3x2 pieces of paper large. Save your
work.
Hint: Remember to delete his tail before
printing.
2)
Save the Pikachu to a second file without his tail and print.
3)
Go back to your original file and delete all the Pikachu except his tail. Print enough tails for everyone at the
party. If you want to save some paper,
you can make
the tails a bit small so that you are able to fit two or three to each page.
4)
Cut out the tails, and put a small rolled piece of tape on the back of each.
5)
Tape the papers to the wall. (the full papers, not the tails)
You’re
ready to play!
.JPG)
.JPG)
.JPG)
.JPG)

.JPG)

.JPG)

.JPG)


